|
|


Scheduling and Auto Run |

|

|

|

|

|
||
|
Scheduling and Auto Run |
|
|
|
|

|

|
Scheduling and Auto Run
|
|
|
Scheduling and Auto Run |
|
|
|
|
|
||
|
Scheduling and Auto Run |
|
|
|
|
|
|
|
|
||
Communiqué V2 now supports report scheduling so you can automatically run and generate reports unattended. You can schedule reports to run once, daily, weekly, or monthly. Scheduled reports can be saved to a directory anywhere on your computer or network as an Adobe Acrobat (*.pdf) file, Excel (*.xls) file, Comma Separated Values (*.csv), Report Archive (*.raf) file. You can also send a scheduled report via email as well so you can have most any report sent to any email recipient you designate automatically and unattended. Imagine coming into work Monday morning with your key sales reports in your inbox waiting for you.
Note: You will need to configure your email preferences in Communiqué before you can schedule a report to be sent by email. See the topic Configuring Email on how to setup email.
To schedule a report for auto run you will need to perform the following tasks:
| 1. | Select the report you want to schedule. |
| 2. | Execute the report by either clicking on the Execute button located in the Standard tab of the ribbon bar, or you can right mouse click on the report and select the "Execute" menu option from the popup menu (Note: the schedule menu option is disabled and will not enable until after you execute the report). |
| 3. | The data filters, if any, will appear. |
| 4. | Select the data filters you want for the report and click on the "Apply" button to apply the data filters to the report and view the results (Note: this is an important step because the filters used to generate the report for scheduling will also be used when the report auto-runs on the schedule date and time). |
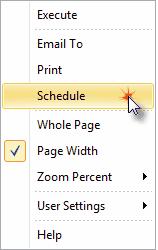
| 5. | Once the results of the report appear, right mouse click on the report and select the "Schedule" menu option for the popup menu like so: |
| 6. | The following Scheduling dialog should appear: |
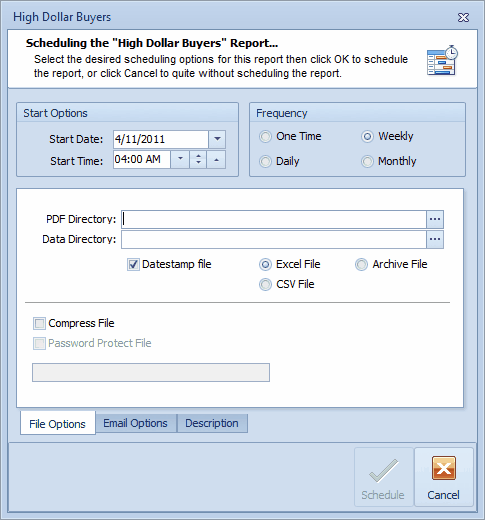
| 7. | The Scheduling dialog has some options preset; however, you must enter either a PDF Directory, Data Directory, or an Email Address in To section of the Email Options tab in order for the Schedule button to enable to you can schedule the report. This is a required step. Though 1 of the three is required, you can optionally set the other 2 and Communiqué will execute all options which are set for this scheduled report. |
| 8. | Fill in all necessary fields to include the following information: |
Start Options: Enter the Start Date and Start Time for the scheduled report.
| 1. | The Start Date is the day when the report is scheduled to run. If you choose a frequency other than "One Time" then this date becomes the next date the report will run. For example: You initially schedule a report to run on 05/01/2011 on a monthly basis. Once the report runs on 05/01/2011 then the next run date will become 06/01/2011. |
| 2. | The Start Time is the time you want the scheduled report to run on the date it is scheduled. If you are scheduling multiple reports to run on the same day, make sure you schedule them at least 5 minutes apart. For longer running reports, you may want to increase the time separation for the reports to 10 or 15 minutes or more as necessary. |
Frequency: Select the frequency the run will run.
File Options:
PDF Directory: Click on the button located on the right side of the edit box to invoke the "Save to PDF" dialog. Select the directory where you want the report to be saved. The file name is report name by default, but you can change it to whatever you wish.
Data Directory: Click on the button located on the right side of the edit box to invoke the "Save to Excel File", "Save to CSV File", or "Save to Archive File" dialog depending on the data file option you choose. Select the directory where you want the data file to be saved. The file name is data file name by default, but you can change it to whatever you wish.
Compress File: Select this option if you want the data file to compress into a *.zip file.
Password Protect File: Select this option if you want to password protect the *.zip file. Selecting this option will require you to enter a password before you can schedule the report.
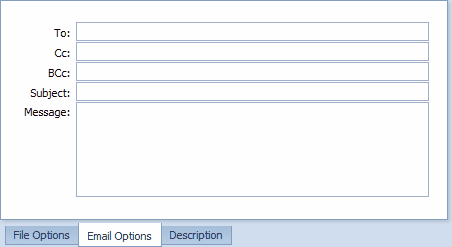
Email Options:
To: Enter the full email address for the recipient of this emailed report.
Cc: Enter the full email address for any one else you wish to email this report.
BCc: Enter the full email address for any one else you wish to email this report privately.
Subject: Enter the subject for this email. This is optional since Communiqué will fill in this field with the report name if it is blank. For example "High Dollar Buyers Report"
Message: Enter the message for this email. This is optional since Communiqué will fill in this field if it is blank.
For example:
High Dollar Buyers Report
Attached is the High Dollar Buyers Report in PDF format.
This report was auto generated and sent via email by Communiqué V2.
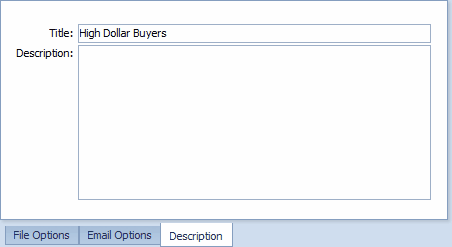
Description: The description is optional, but useful. You can use the description to describe the particulars about a schedule report. This description can come in handy when you run the same report more than once with different parameters.
Title: Enter the title of the schedule report. By default this is the report name.
Description: Enter a detail description of the scheduled report. In particular describe which filters are used and purpose of the report. This will be useful when you are comparing the same report scheduled to run at different times.
Congratulations! You're are now ready to schedule and auto-run reports in Communiqué.